Lab 9. Immunofluorescence Microscopy
In the last lab exercise, you learnt how to make antibody conjugates. In this lab exercise you will learn one of the applications of antibody conjugates, immunofluorescence microscopy. Tagging antibodies with fluorochromes makes antibodies visible under a fluorescence microscope, allowing visual detection of the antigen to which it binds. Using immunofluorescence microscopy, the tissue distribution and cellular distribution of a particular antigen, such a bacterial pathogen, can be analyzed, and tissue and cellular structures can be visualized. Different antibodies can be conjugated with fluorochromes emitting different colors of fluorescence. Using antibodies conjugated with different fluorochromes, two or three different antigens can be detected at the same time. Immunofluorescence microscopy is a very powerful tool for cellular, immunological and medical research.
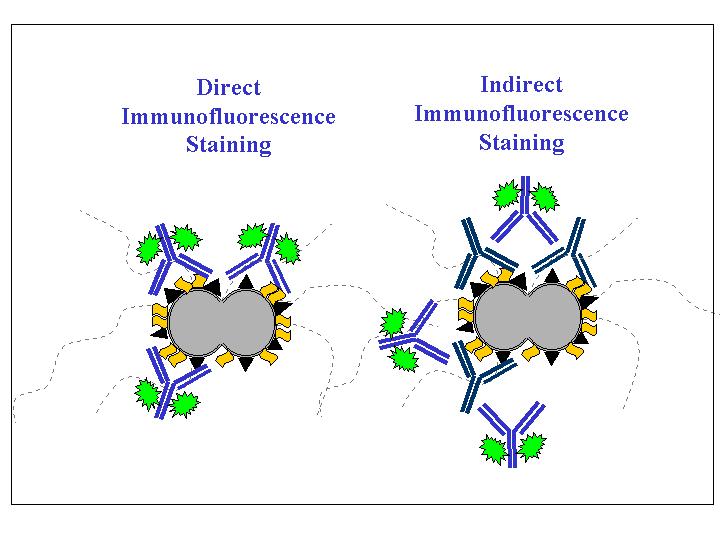
There are two methods of immunofluorescence staining, direct and indirect. For direct staining, the antibody directly against the antigen to be detected is conjugated with fluorochromes. For indirect staining, the antibody directly against the antigen to be detected is not conjugated with a fluorochrome. To detect this antibody-antigen interaction, an additional antibody that specifically binds to the first antibody and is conjugated with a fluorochrome will be used. The antibody that directly binds to the antigen is called the primary antibody. The antibody that binds to the primary antibody is called secondary antibody. Indirect immunofluorescence is often used to determine whether a patient is producing antibody against a particular infectious agent in order to confirm a diagnosis. In such assays, the infectious agent is used as the antigen, the patient’s serum is the source of the primary antibody, and a fluorochrome-conjugated anti-human IgG antibody is used as the secondary antibody.
In this lab exercise, you will learn to use direct labeling to analyze the cellular distribution of the B cell antigen receptor (BCR) in B cells. The BCR on the surface of B cells captures specific antigens from the environment. Then the BCR internalizes and transports antigens to special subcellular compartments where antigens are processed. Processed antigenic peptides are presented by MHC class II molecules on the B cell surface for the recognition of T cells. To follow the intracellular movement of the BCR, the surface BCR will be labeled with a fluorochrome-conjugated antibody at 4oC. Unbound antibodies will be washed away. Then the B cells will be incubated at 37oC. During the incubation, the surface-labeled BCR will move from the cell surface into cells.
Please learn how to name an antibody.
Example:ConjugateHost antigen
FITC-goat anti-mouse CD4Procedure
March 1
During the exercise, it is very important to keep your samples in the dark and not to let your cells dry out.
1. Add 5 ml (0.75 mg/ml) fluorescein-labeled goat anti-mouse IgM antibody to mouse B cells (~106 cells/ml x 0.25 ml in DME/BSA). Gently mix by flipping the tube a couple of times.
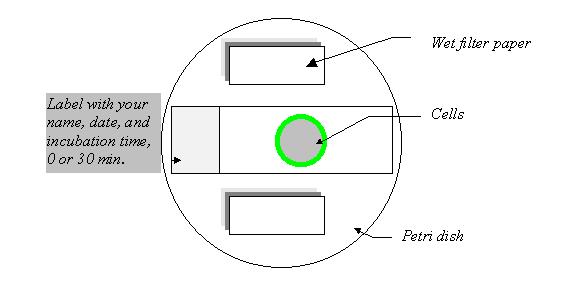
2. Transfer the cells to slides, 100 ml cells to each circle.
3. Incubate the cells at 4oC for 40 min in a humid chamber. During the incubation, the cells will adhere to the slide and the antibody will bind to its antigen, the BCR on the cell surface.
4. Wash off the unbound antibody. Two students in each group should wash the 0 time slide with cold PBS three times. To wash, remove the solution from the side of the circle using a pipetteman and add a few drops (>100 ml) of PBS onto the circle to cover the cells. Please never let the cells dry.
5. At the same time, the other two students in the group should wash the 30 min slide with cold DME/BSA three times as described in 4. Incubate the 30 min slide at 37oC for 30 min in a humid chamber.
6. Fix the cells on the 0 time slide with 4% paraformaldehyde for 10 min at room temperature. Paraformaldehyde non-specifically crosslinks cell-contents to preserve cell morphology. To fix the cells, remove the PBS, add a few drops of 4% paraformaldehyde onto the circle and leave the slide on your bench for 10 min.
7. Wash the fixed cells with PBS three times.
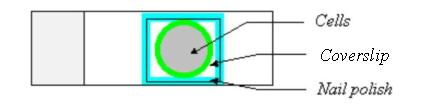
8. Mount the slide. The gel/mount helps to preserve the fluorescent signal and cell morphology. To mount, remove PBS, and add one drop of the gel/mount onto the cells. Please add only one drop of the gel/mount!!! Put a coverslip onto the cells. To prevent from any air bubbles being trapped under the cover slip, let one side of the coverslip touch the gel/mount first and then slowly lower the other side of the coverslip. Remove any extra gel/mount leaking out from the side of the coverslip with a pipetteman (p200). Seal the four sides of the coverslip with nail polish.
9. By the end of the 30 min incubation, wash the cells on the 30 min slide with PBS three times. Then treat the cells as described in steps 6, 7, and 8.
10. Leave the slides on your bench to dry. Your TA will store the slides at 4oC.
March 3
11. Observe the slides under a fluorescence microscope.
Reading
Immunobiology A-14Study Questions
1. What is the difference between the direct and the indirect fluorescent antibody staining?
2. Please list two different applications of immunofluorescence microscopy.
3. Describe how to label the T cell antigen receptor using indirect immunofluorescent staining method. What antibodies do you propose to use? Please give an example. The names of the antibodies should include the following information: hosts where antibodies were generated, specificity of the antibodies, and names of fluorochromes (such as FITC-conjugated goat anti-BSA antibody).
4. Describe how to use the indirect immunofluorescent staining method to detect whether a patient has had a Salmonella infection. List reagents and describe the procedure.